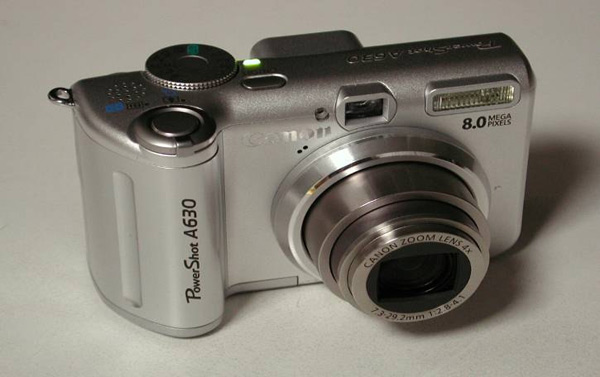
If you’ve been watching the Lowbrows’ email space lately then you’ve no doubt seen some of the wide-field astrophotos I’ve been posting recently. And you’ve probably also noticed that I’ve taken most of them with a point-and-shoot camera. If you’ve been wondering how I’m doing it with such an unsophisticated camera, then here’s your chance to learn my secrets. And if you own a late model Canon point-and-shoot digital camera, then chances are you can get in on the action as well.
Truth be told, the “secret” isn’t a secret at all. It’s
actually a free, public web site that someone (whose name escapes me)
pointed me to. This web site tells you how to turn your ordinary Canon
point-and-shoot camera into a super-camera. The
URL is
http://lifehacker.com/387380/turn-your-point+and+shoot-into-a-super+camera .
The main gist of this web site is
that, at least in Canon’s case, the camera’s hardware is capable
of far more than what its menus and controls let you do.
The “hack”, called the Canon Hacker’s Development Kit, or
CHDK, consists of new firmware you can upload onto your
camera to let you unlock capabilities that you most likely didn’t
even know were there.
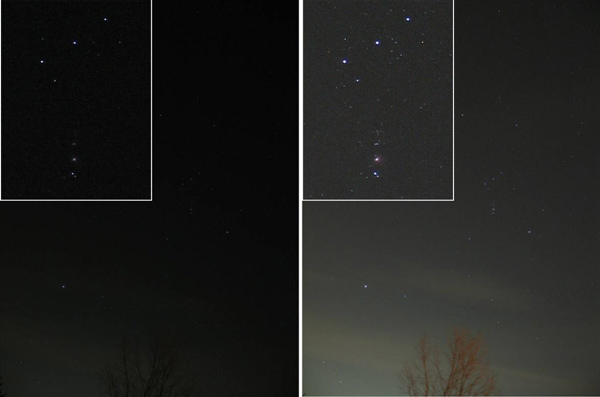
Here’s an example. The most important capability in my opinion when taking astrophotos is the ability to take long exposures. My camera, a PowerShot A630, only allows up to fifteen second exposures. That’s not very long. But with the CHDK firmware upgrade, it can now go up to 64 seconds. In photography terms that’s slightly more than two stops worth of additional exposure. Here’s a side-by side comparison. The image on the left is a 15 second exposure, and the image on the right is 64 seconds. The insets show how many more stars are captured with the longer exposure—even the Orion nebula begins to show up.
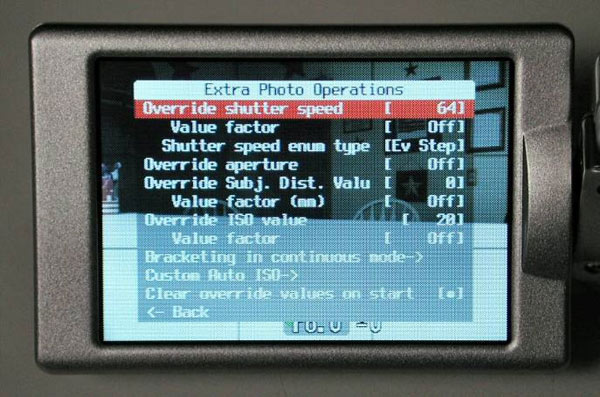
How does this CHDK firmware upgrade actually work, you might ask. You can get all the details from the web site, but in a nutshell you first determine if your camera is supported, and if it is, you download the firmware update to your computer, and then write it to your camera’s memory card. When you turn your camera on, it will behave just as it always has. But with a simple menu sequence, you activate the upgrade. You then have a bunch of additional menu options, everything from RAW mode settings to shutter speed and ISO and aperture overrides to more informative battery life indicators. You can also download scripts, for instance to have your camera take a series of pictures at set time intervals, or even to play games—on your camera! I’ve not yet done anything with scripts, but I’m definitely planning to try out some available so-called “intervalometer” scripts, to see if I can make some time-lapse animations of the night sky. Another bonus of CHDK is that it’s useful even if you never use your camera to photograph the stars—it’s equally applicable to daytime photography. For example, I’ve found that with CHDK I can stop my camera’s lens down to f/11 or even f/16, up to two stops slower than the f/8 that the standard menus limit it to.
Besides longer exposures, another feature of interest when shooting astrophotos is the ability to obtain images in RAW mode. RAW format is the encoding of the image file as taken by the camera’s sensor, before the camera does any post processing. With most digital cameras, after the image is taken, the camera performs electronic processing on this “raw” image and saves it in a compressed form on the memory card, typically in JPEG format. For general photography this results in a decent looking picture, and one that doesn’t take a lot of room on the memory card, but it has some drawbacks. The first is that the JPEG compression performed by the camera, even at the camera’s highest resolution setting, adds artificial artifacts to the image. Also, image contrast can suffer, where shadow details can become lost or bright highlights can become burned out. Most digital single lens reflex (SLR) cameras let you save RAW images, but it’s unusual in point-and-shoots. The Canon Hack firmware upgrade lets you save the RAW image along with the JPEGs.
Keep in mind that RAW images cannot be used directly. You must first convert it to a usable format, massage it using photo processing software, and then save it to a viewable format, again typically JPEG. So why bother if you’re going to end up with basically the same thing? The answer is that the camera only has its built-in program to do the processing. This “one size fits all” approach, particularly with point-and-shoot cameras, can only do so much on individual images, especially on astrophotos. Yes, they build some amazing circuitry into modern cameras, but still it can’t do nearly as good a job on astronomical images as a human can working on a computer with image processing software. The bottom line is that RAW is the format of choice for astro-imagers.
Unfortunately, as of this writing I haven’t done much with RAW format. I just haven’t spent the effort to climb the learning curve yet. But rest assured, one of these days I’ll be working with them and I’ll be sharing my results. So in the meantime, everything I’ve shared up to now has been done with JPEG images.
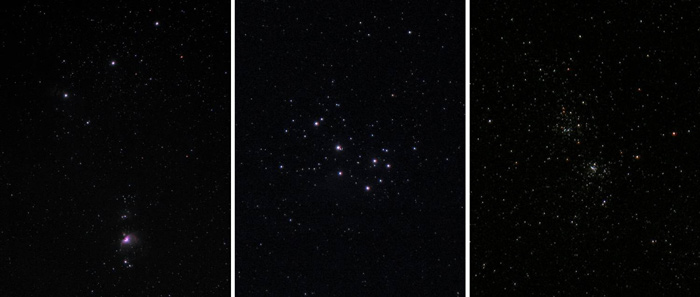
Here are some pictures I took with my Canon “super camera” from Peach Mountain on March 13, 2009. You may notice that the Flame Nebula is faintly visible to the ENE of Zeta Orionis, and the Merope Nebula is making a bit of an appearance in the Pleiades. These images won’t win any awards, nor will you find them in the gallery pages of Sky and Telescope magazine, but keep in mind they were taken with a point-and-shoot camera!
The only other thing you’ll probably need if you want to take longer exposures at night and get tight star images is a tracking mount. An equatorial mount is preferred, but I think with an alt-azimuth mount a 64 second exposure won’t produce a noticeable amount of field rotation (though if you stack multiple images it could). Any driven mount will do—it doesn’t have to be a beefy mount at all. Point and shoot cameras are very light, certainly much lighter than any telescope, so weight won’t be a factor. You could even use a homemade barn door drive with good results. And if you don’t have a driven mount, even at 64 seconds you won’t get a whole lot of star trailing. Just setting the camera on a tripod will do, particularly when shooting at wide angles.
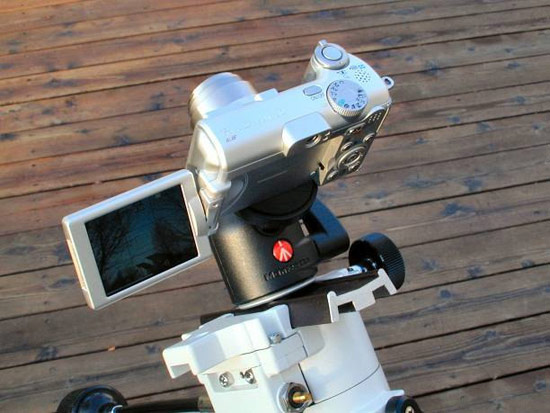
One more accessory that I recommend is a ball head for mounting the camera. It lets you swivel the camera to almost any orientation, making it much easier to frame your target regardless of where it is in the sky. I use a Bogen/Monfrotto 486 head, which is a little large, and probably overkill for a point-and-shoot camera, but I also use it with my SLR camera which is bigger and heavier. A smaller one will do. I mounted it on a dovetail to make it easy to attach to my mount. Here’s a picture of my rig:
So do you have a late model Canon point-and-shoot camera? If so then you might want to give CHDK a try. Will your pictures make you famous? Maybe not. But will you have a lot of fun? I guarantee it!
[To see larger versions of these and other images I’ve taken with
my “new” super-camera check out my gallery at
http://picasaweb.google.com/djscobel/CanonHackin?feat=directlink—Doug]