

A little while ago, OK it was 3 years but who’s counting, I wrote an article about a tripod I built using crutches. [See “Your Own Tripod, Cheap!,” by Doug Nelle, July, 2003.] At the end of that literary masterpiece I threatened to write about the scope I put on it. So grin and bear it.
A few years before the tripod was made I had purchased one of the used refractor objectives that had been appropriated by one of the Lowbrows from KMS Fusion when that business had closed their doors. It took a year to come up with more money and then I jumped into the project to turn the 5 inch f/5 Jaeger’s achromatic lens into a scope. A little confession at the beginning, the tube assembly was mostly built before I made the tripod. An early test on a prototype pier mount made from PVC pipe proved too unstable. So I made the tripod and then finished the scope.
The lens came in a cell so I didn’t have to worry about having one machined. The idea was to be able to make the tube assembly with just power hand tools and hardware purchased at the local store. The only items I purchased from venders were the focuser and an azimuth pivot bolt/bushing. More about the pivot bolt later.
The tube was a 2’ chunk of a longer 6’ aluminum piece that had a 6” inside diameter bought at a junkyard. It was part of a hoist because it had a sticker on it warning not to run the hoist if something wasn’t secured. Not bad advice when using your telescope either.
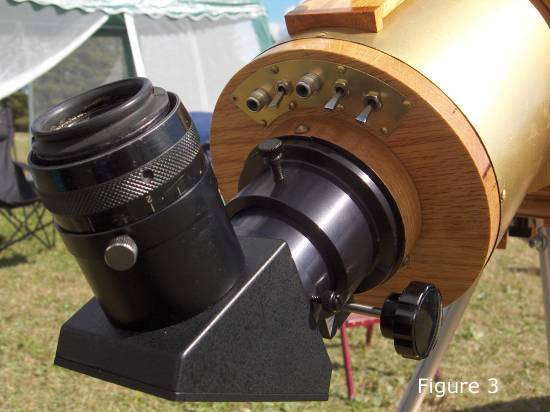
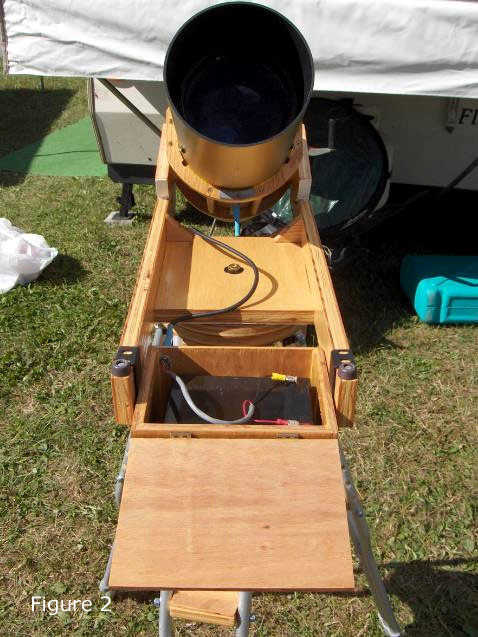
The finished scope is seen in fig. 1. The azimuth counterweight is a box containing a 12v battery for anti-dewing. Figure 2 shows the battery and the connecting cable to the tube. Wiring is run internally to a rear plate (fig. 3) with switches for turning on 12 volts to eyepiece and finder connectors and to turn on power to the objective heater. The objective heater is 12 volt heat rope bought at a swap meet wound around the cell.
Mounting the cell inside the tube and still allow for aligning the objective took a few seconds of thought because there wasn’t sufficient clearance between the inside diameter of the tube and the outside diameter of the cell to permit using a push-pull arrangement of bolts. What I did was to make a plywood ring that fit over the smaller rear end of the cell that had the same outside diameter as the inside diameter of the tube. This ring was siliconed to the objective cell. 3 wood screws through slightly oversized holes in the tube screw into the wood ring. To adjust the cell (adjustment was necessary to get round star images) you loosen a screw and move it forward or back in the hole and retighten. You can see these screws in figures 1 and 5 about a third of the way down from the top of the tube. Recessing the objective back allowed the tube to be both a glare and dew shield. Moving toward the rear of the tube assembly there are 2 internal glare stops.
The rear plate (fig. 3) is one piece of 3/4” oak cut out with a router. The forward side has a smaller radius cut on it so it will slide up in the tube. Making the ring that the focuser fits into is the only time I used a bench tool during the project. The two radii were cut with 2 different hole saws on a drill press where I work.
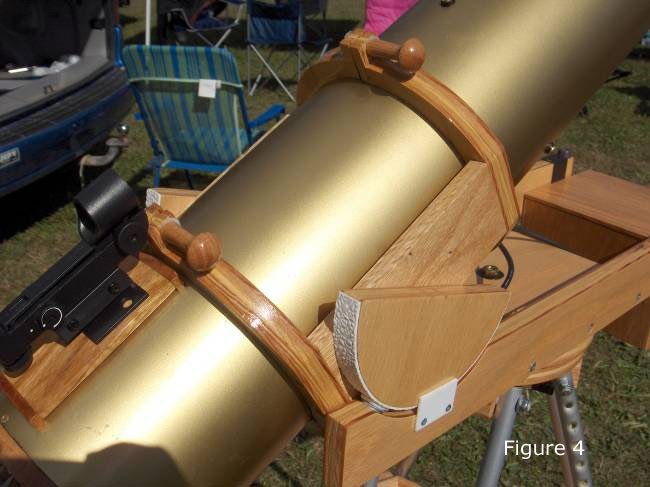
Figure 4 shows the finder platform, the altitude bearings and the tube clamps. The finder platform has a T nut underneath so that different finders could be mounted. A BB gun sight finder is what I normally use for night work. The bearings are FRP (fiberglass reinforced panel), also known as glass board on Teflon. There are no hinges on the tube clamps. Machine screws in the wood drawer knobs go through to T nuts on the other side of the clamps. Felt on the inside of the clamps keeps the clamps from scratching the tube. The scope tube itself was painted with an automotive aluminum wheel primer and a gold/brass top color to give it a fake brass look. The tube clamp/altitude bearing stays on the scope during storage.
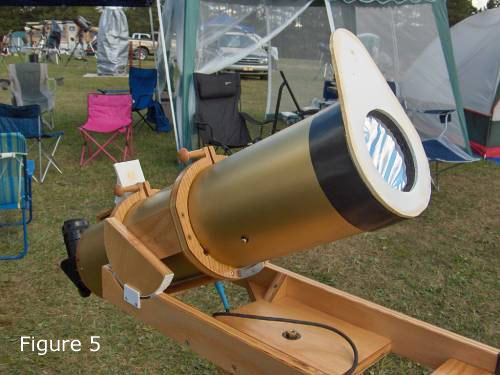
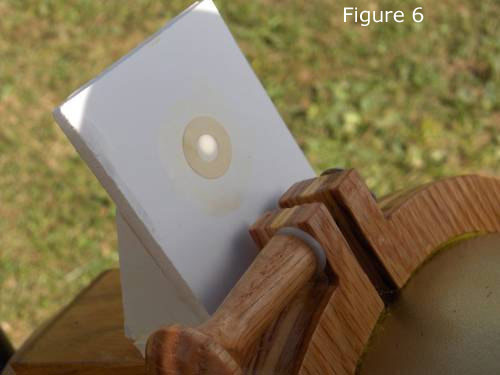
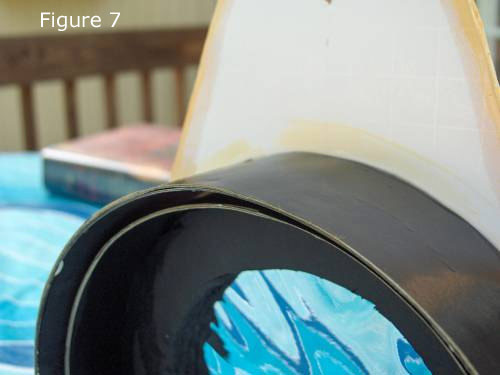
Figures 5, 6 and 7 show an aluminized mylar solar filter I made. It was constructed using foam core posterboard normally used for science fair displays and heavy black construction paper. It has a 4” clear aperture. In figure 7 you can see there are 2 rings built up from the construction paper. One fits over the scope tube and one fits inside. It’s a very snug fit over the end of the tube. The filter takes some force to put on or take off. It’s not going to blow off in the wind. Figure 6 shows the “finder” for solar viewing. A pinhole in the foam board of the filter projects a spot on a target made from the posterboard. A paper reinforcing ring serves as a bull’s-eye.
I kept it inexpensive. The “previously owned” objective was $100. The focuser was just over $100. The 12 volt 12 amp-hour anti dew battery was $25. The aluminized mylar is one corner of a square foot piece of Baader Planetarium filter material I got at the Chicago Astronomical Society’s Astrofest star party for $10 (instead of the usual $40) because the sheet had a cosmetic crease in it. The BB gun sight finder was won as a door prize at the Black Forest star party for the price of a couple tickets. The aluminum tube was $20. I should also include the $70 for the 2” mirror diagonal seen in the pictures because I only use it with this scope. There was probably no more than $40 in parts for the rest of the tube assembly and altaz mount.
It sets up quickly. It’s only 10 minutes from when I decide to do some solar observing to when the tripod, scope, diagonal, eyepiece and solar filter are in the yard and ready to go.
The first altitude bearings were 2” PVC pipe floor flanges. They worked great! Way too great! You couldn’t change focus without the scope running away in altitude. So I changed them to the 6” diameter wood with FRP board ones seen in the pictures. Larger wouldn’t hurt.
The tube clamps work fine but they were a bit of a hassle to construct and if I want to take the scope out of the clamps I have to slide the tube assembly out one end. You can see a notch in the front clamp at the 8 o’clock position in fig. 5 so that it can slide past the screw heads in the tube assembly. I might consider a clamshell type clamp with hinges and latches in the future.
I bought a commercial azimuth pivot on a lark just to see what was so great. In a nut shell nothing, unless you were going to use digital setting circles. The pivot is bored out on the top to accept a shaft encoder. Otherwise just buy a shoulder bolt, a bushing and a T nut at the hardware store. I hope all the scrounging, recycling type ATMs out there will forgive me for this momentary lack of ethics.
I like the look of the tube but if I were to do it over I think I would make a square wood tube. There would be no work cutting circles with the router. No need for tube clamps, just a way to slide the altitude bearings a little. And plenty of room in the corners around the objective for alignment bolts. Plus a few bucks less in cost.
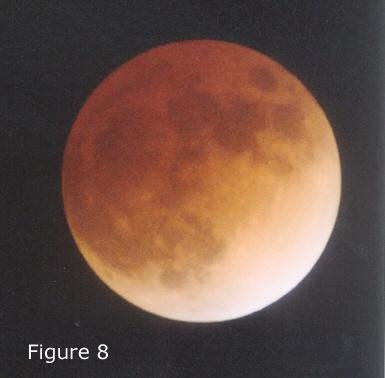
I mostly use a surplus 2”, 28mm f.l. eyepiece seen in the pictures that gives a 3 degree field of view at 22x. With plenty of poor images at the edges! None the less I love the wide angle views it affords. I also made the length of the tube such that I could put a 35mm camera on to take shots of the moon and sun. Some of the things that stick in my mind over the last few years are:
2 total lunar eclipses with lots of Cub Scouts in tow (fig. 8).
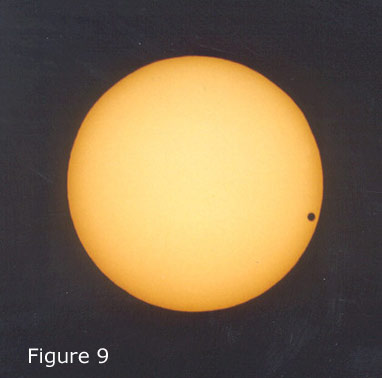
The transit of Venus across the sun observed with my daughter (fig. 9).
Comet C/2001 Q4 (NEAT) going by the Beehive.
Any open clusters visible. Views of these objects have earned scopes of this type the name “Cluster Buster” by some club members. The view of M46, M47 and NGC 2423 in Puppis in the same field is to kill for!
Low power wide angle views are a joy. Especially when done at dark observing sites. You do not need a multi-thousand dollar apochromatic objective to enjoy these types of views. If you ever get the chance to pick up an f/5 or f/6 lens consider the ease of use and the great views you will get and build a scope!
For this scope probably a nice wood case to store it in instead of the cardboard box it’s in now. I just need to find some thin plywood lying around.