
It’s been awhile since I’ve written an article for the Newsletter, mainly because I’ve want others to contribute and some of you have (the rest of you need to step-up to the plate!). The other reason I haven’t written anything lately for the Newsletter is that I have been busy with some new equipment and just had not yet got around to putting some words down on paper.
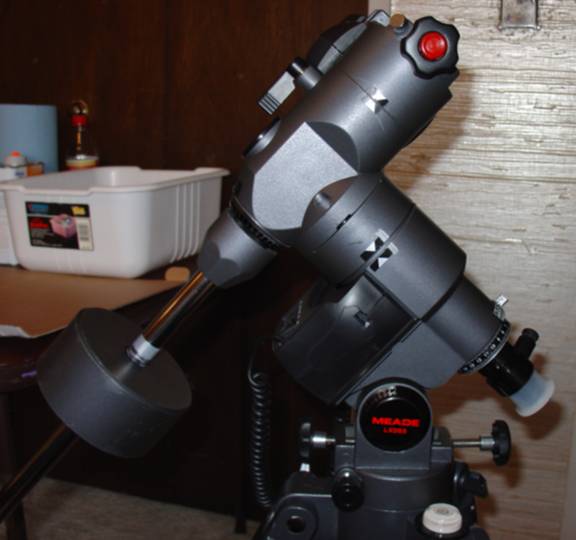
Well, I think, I have enough info to write an article about my GEM. The first thing I should do is explain that GEM is an acronym for German Equatorial Mount, and my GEM is a Meade LXD55 with dual axis drives and Meade’s AutoStar computer GOTO system. I purchased it on ASTROMART, which is an online classified system for selling and buying and trading new and used astronomy equipment (http://www.astromart.com). I bought it used and got a pretty good deal on it. Now, the next thing you need to know is that it was just the mount and tripod, in other words no telescope, which is exactly what I wanted, because I intend to put my 5” f/5 refractor on it. With my Taurus Tracker and Hyper-Camera for wide-field astro-photography or Meade’s DSI CCD camera for higher power deep-sky digital imaging, this set-up would suit my needs very nicely, and I will add at a reasonable cost (to be discussed later).
Until recently most of my observing has been with equipment that did not track the movement of the sky automatically, if I wanted to examine an object for periods lasted longer than a few seconds, I would have to move my scope manually. This was okay for relatively low to medium powers, however if I wanted to examine an object a high powers this manual tracking was very inefficient, and I now wanted to do some astro-photography. So, tracking devices for my various scopes became a must. I bought a Johnsonian tracking platform for my 12.5” f/5.6 Newtonian reflector and a cheap GEM with a single axis drive (R.A. only) for my 5” f/5 refractor. The former will be discussed in an article written at some other time, the latter, my cheap GEM with a single axis drive suited me fine for awhile, however wide-field exposures of longer than 5 minutes produced an unacceptable amount of star trails and periodic errors on film, at least they were unacceptable to me. I wanted greater accuracy and the ability to take longer exposures, I might add that for visual observations a single axis drive system on a reasonably align mount will be more than adequate for just about everyone.
I looked at some rather expensive mount and drive systems that would more than meet my needs but I was planning on mounting a 5” f/5 refractor that I made using a $125 cemented Jaeger doublets, that although they are good pieces of glass, they are not color corrected and not fully coated, a $1500+ mount and drive system would not make a lot of sense. I needed to find a mount and drive system more inline with the $300 I put into the actual scope. My search led me to Meade’s LXD55 series mounts and drives, Meade uses them on a line of telescopes that includes both a 5” and a 6” achromatic refractors. However, Meade does not sell mounts without telescopes and I didn’t need to purchase another telescope, so I need to find someone selling just the mount and drive system. It turns out that a number of people who purchased these complete sets did so just to use the telescopes with other drives and mounts, so ASTROMART listed a few and at costs more inline with my budget. Meade has recently started selling the “Up-graded” version of the set-up in the guise of the LXD75 series, so this helped to add a few more LXD55’s to the supply end of the available mounts and drives for sale on ASTROMART.
Now, a reasonably well manufactured GEM that is mass produced will have its share of imperfections and these can be anywhere from very minor (a missing set screw or a small scratch on the tripod) to major machining errors. The latter of these are usually caught at the factory, but sometimes they slip out and most manufacturers prefer satisfied customers and will almost always correct the problems usually at little or no cost to the consumer. The LXD55 is mass produced by machine and assembled in China, now please do not think that simply because something is “Made in China” that it is of inferior or substandard grade. That is not the case; Meade’s reputation for producing high quality products prevents them from selling inferior grade equipment.
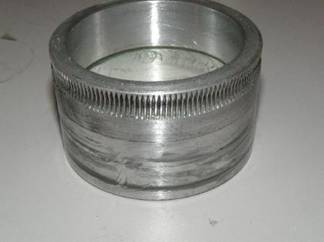
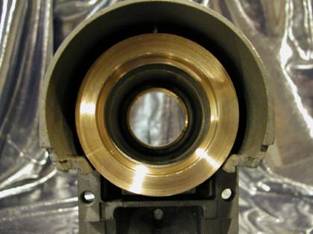
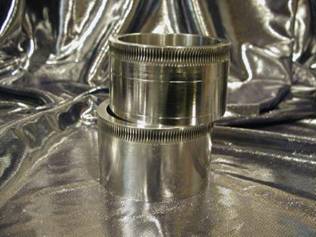
With that said, let me share with you some of the specifications of LXD55 mount and drive system. First, the both the R.A. and Dec. axis are 2”+ machined aluminum alloy shafts, and are housed in machined brass journal bearing, the main drive gears are harden machined aluminum alloy and are match to 2.8” brass worm gears. There are a lot more moving parts inside a German Equatorial Mount than I ever dreamed, and each one affects the operation and accuracy of that mount. This is something I found out very quickly after purchasing this mount. Machined parts are a good way to mass produce things, but they can a little rough in their finish with small burrs or nicks on the surfaces. In a precision instrument like a GEM these produce periodic errors as the gears mesh and shafts rotate in their bearings. The rough finish also makes the drive motors work harder to do the job that they were meant to do.
The grease that is used on most Chinese produced mounts is not very good as far as viscosity and purity goes, and this too adds to problems in the smooth operation on the mount. The computer controlled drive system that came with this mount was Meade’s AutoStar system and the specifications on it would be more than good enough for my application, however learning the AutoStar operating systems would provide its own set of challenges. But I knew all of these things before I purchased the LXD55, and was prepared to deal with them one at a time. I had done some research and with a little effort and a free weekend I could have a high quality dual axis computer controlled GOTO scope that should provide a stable accurate platform for both visual and photographic applications.
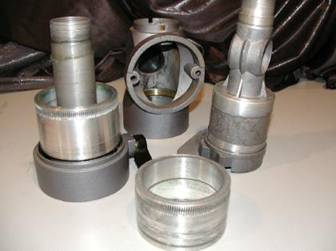
Now, to see just how rough this GEM was, the LXD55 has been around for long enough that most of the long time owners have found and corrected most of the “bugs” in the system and have established a couple of “User Groups” on Yahoo to help out those first time users. It was from these user groups that I learned of Richard Harris who runs a website totally devoted to the operation and maintenance of LXD55 systems (http://lxd55.com/). Almost every one of the long time owners of the LXD55’s spoke very highly and recommended his “Hyper-tuning.” Now, before you ask, “Hyper-tuning” is the process of disassembling, cleaning, sanding, polishing, re-greasing and re-assembling the LXD55 mount, to hopefully make it operate better than new. Richard will for a fee, Hyper-tune your mount at his shop, or you can purchase (for about 1/3 the cost) the kit which he sells along with a step by step DVD and do it yourself. Being somewhat apt I opted for the second, not only for financial considerations but also to gain a personal understanding of how GEM’s work. Ahhh, that unquenchable thirst for knowledge, I fear it will be my undoing yet, but not this time.
I am not going to do a step by step of the process involve in Hyper-tuning a LXD55 mount, lets just say I learned ... A LOT!!! I learned that these mounts have a HUGE number of moving parts and if they are not of good to excellent quality they will adversely impact the smooth operation of the mount dramatically. I also learned that some of the HUGE number of parts that these mounts have are not of the highest quality, for instance there are 8 plastic washers/bearings that were cut poorly, these were replaced with “Teflon” ones during Hyper-tuning and the grease was very sticky and of low quality, this was replaced with high grade white lithium grease. A number of gears had little burrs in their teeth and inadequate set screws to hold them to their respective shafts; these were addressed during the Hyper-tuning also. Now, don’t get the idea that my mount was a mess or that Meade produces poor products, quite to the contrary, I only point out these imperfection to illustrate how a mass produced mount can be improved. Once I finished all the cleaning, sanding, polishing, and re-greasing, I re-assembled the mount and checked its performance and needless to say, I was pleased.
Now, I wanted to check the Polar Alignment Scope that comes with this set-up and make sure it was align perfectly in the R.A. shaft. The easiest way I know how to do this is; while in the R.A. shaft center a point some distance away and manually rotate the mount on it R.A. axis. If the object stays in the center then the Polar Alignment Scope is align properly. If the center of the PAS loops around that point then you need to adjust it, my PAS had three set screws for this type of adjusting, and I found that my PAS was way off! No matter how carefully I would do my polar alignment at the beginning of the night, it would not have been any good with a PAS that far out of whack! After about a half hour of adjusting and tweaking I got it right, and now when I go out and polar align I can be confident that it will be right!
The next thing I needed to do was learn how to use the AutoStar computer control system. Meade provides a nice little instruction manual that gives one a basic outline of how to operate the system and some idea of how to set-up your scope, but I found it to be a little weak in detail, but some practice time under the skies and I should be able to figure out all the little tricks, after all it is very tried and proven system. The only problem will be the manual’s “too small” print in the dark! Meade you need to do a better job here! But I’ll manage to get the hang of it after a few trials and errors.
So, what’s the bottom line? Well, I spent about $300 on the OTA (optical tube assembly), $300 on the GEM, and another $100 on the Hyper-tuning, and now I have a system that should provide a very stable, highly accurate platform for both visual and photographic use, and its GOTO technology should make its operation highly enjoyable. As soon as we get a couple of clear nights I’ll let you know if all my work has paid off, but for now I give it two slightly bruised thumbs up!