Few celestial phenomena are as spectacular and captivating as the Aurora Borealis, otherwise known as the northern lights. On the evening of Sunday, November 7, 2004, much of the northeastern United States and eastern Canada was treated to just such a display. I took some photos from my back yard, and many of you have seen them. Now you may think that capturing an aurora’s delicate features and awe-inspiring beauty on film can be a little daunting. The good news is that you can do the same thing. All it takes is some modest equipment, and the application of some simple techniques. It can definitely be done the Lowbrow way!
Before I start, I want to mention that I have direct experience only with film cameras when photographing auroras, so I may be a little off on my advice with digital cameras. But what I’ve outlined here should give you a good starting point, regardless of what kind of camera you use. Still, you may have to experiment some to get the best results.
First, you need a camera capable of long exposures, at least up to 30 seconds. Most 35mm single lens reflex (SLR) cameras will work. Auroras are generally not that bright, and you need to keep the shutter open long enough for the image to register. If you are using a digital camera, then you’ll need a similar capability.
As far as film goes, ISO 200 or 400 film ought to work well. In the “old” days, anything faster would tend to yield images that were too grainy. But today’s modern films, at ISO ratings of 800 or even faster, may provide good results too, although I have not tried them and cannot say for certain. As I said earlier, feel free to experiment!
The other prerequisite is a way to steady the camera. You simply cannot hold it by hand and expect a sharp image. This is where a tripod is essential. If you do not have a tripod, then find a way to prop and aim the camera on a table or something solid so that you don’t have to touch it while the shutter is open. Regardless of how you support the camera, you also need a way of tripping the shutter without touching the camera. Use a cable release, or use the camera’s self timer.
To take the photos, use the widest-angle lens you have, open the aperture as fast as it will go (50mm lenses are usually around f/2, 28mm’s around f/2.8), put the camera on the tripod, aim it roughly north, and shoot away. You need to take a long enough exposure to capture the aurora, but you don’t want to go too long, because auroras move around and they may be “smeared” on the image. Between 15 and 30 seconds is ideal. You’re also limited to similar exposure times if you don’t want stars to trail noticeably. This places a limit of about 15-20 seconds for a 50mm lens, and 30-40 seconds for a 28mm wide-angle lens (when using a 35mm film SLR). Of course, if your camera is mounted on some kind of drive, then star trailing is irrelevant. For the rest of this article, though, I will assume that you are not using a drive.
As I said earlier, to avoid shaking the camera when opening and closing the shutter, use a cable release or the self timer. If you can use neither, then you can use the old “hat-trick” method. Put a hat or large piece of dark material in front of the lens, open the shutter, remove the hat, and after the prescribed exposure time replace the hat and close the shutter.
When using ISO 200 film, you’ll need a good 30 seconds to get a decent image, and at least half that when using ISO 400. I would recommend you use the longest exposure you can get away with without having the stars trail or the aurora smear. In other words, use the fastest film you are comfortable using, and expose for say 15 seconds with a 50mm lens or 30 seconds with a 28mm. If you’re unsure, then bracket your exposures by one stop either way. To bracket, besides exposing for the “ideal” time, expose also for maybe one half that time and also double that time. That way you can “cover your bases,” and the best image will likely be one of the three. Be sure to write down what you do for each exposure, so that when you see the final pictures you know what combination worked the best.
If you are using a digital camera, then exposure times and lens settings should work similarly. But in terms of how long you can expose before stars start to trail, note that you’ll have to compensate for digital camera lens’ shorter focal lengths. The smaller image plane in digital cameras means that shorter lens focal lengths cover the same area of sky as longer 35mm SLR lenses. You may wish to experiment with non-aurora shots, to see how long an exposure you can take before star trailing becomes objectionable.
Another thing to watch for when using a digital camera is to use the highest quality setting your memory card will let you use. Each picture will consume more storage than with a lower quality setting, but it will be sharper and have more detail in it. Despite what you see in movies and TV shows, if the detail is not present in the original image, then no amount of digital post-processing can recreate it.
If you use a film camera, then it’s time to have your film developed. Now I have had occasions where the developer decided that my photos of the night sky were out of focus and/or underexposed, and they decided not to print them! So I always provide special instructions, directing them to print all exposures, regardless of how they look. Also, you may wish to tell them not to cut the negatives. If the pictures are way under-exposed, then the developer may not be able to detect the frame edges, and could cut the negative right in the middle of an image! I’ve also seen this happen.
If you don’t have access to a computer with image processing software, then you’re done. But if you do, then you’ll want digital copies of your pictures too. I always send my film to Kodak for processing and printing, and also have them add the images to a CD at the same time. It’s relatively cheap and they make very high quality, high resolution scans right off the negatives. These scans are far superior to what you would get by scanning the prints using a flat-bed scanner.
Now that you have your photos, you may be perfectly happy with them. But, they might look a little dull and lackluster. This is where the so-called digital darkroom comes in. A little bit of digital “magic” can make the difference between an ordinary-looking photo and a real stunner.
In a raw digital image, there are all kinds of information that might not be apparent. Colors may be subdued, or there might not be much contrast. Plus there might be some defects that you wish were not there, like dust, scratches, or airplane trails. All of these shortcomings are easily corrected with image processing software, like Photoshop, or Paint Shop Pro (which I use). Generally, I’ll first remove any defects I don’t want, such as airplane trails or dust. Then I’ll adjust the contrast so that there’s a good balance between the dark and bright areas of the image. Finally I’ll adjust the color saturation to make the colors really pop out, being careful not to over-do it. Sometimes it’s hard to believe that the finished product actually came from the original.
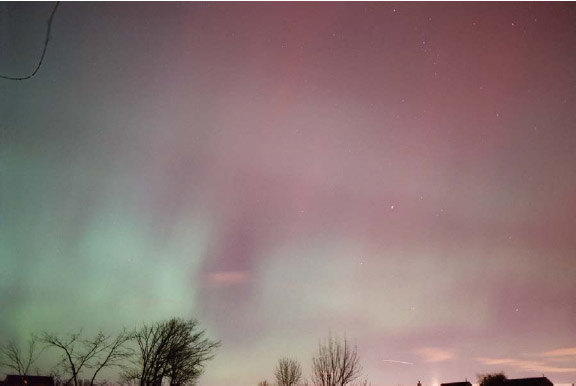
Here’s a before-and-after example. The original picture below looks flat and lifeless. An airplane left a straight trail right of center near the bottom, plus there was a small hair in the camera which exposed itself in silhouette in the upper left corner of the negative.
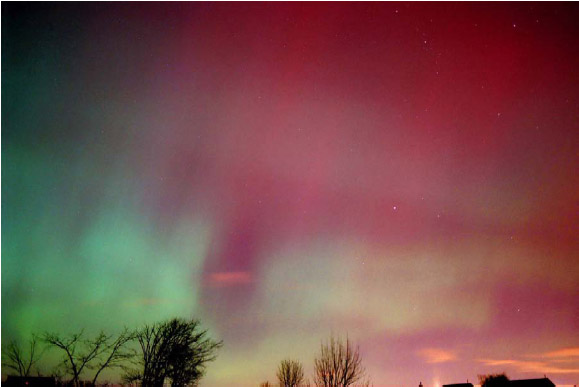
Here’s the same photo after processing. There’s much more “pop” in the image, plus the unwanted defects are gone. The picture has really “come to life.”
There you have it. With simple equipment and a little practice now you too can produce your own stunning aurora photos. All we need now is to be blessed with another display of the northern lights!