Have you ever looked at some of those amateur made digital images in Sky and Telescope magazine with a bit of envy in your heart? After all, it takes a lot of expensive equipment to take those kinds of pictures, doesn’t it? At least that’s what I thought until I actually tried it. What a surprise! I’ve found out that most anyone can take digital images (of certain subjects, anyway) that will make you look like an expert. And it won’t cost you a couple mortgage payments to do it either!
First off, you will need a digital camera. But what kind? What features do you need? Well, virtually any modern point-and-shoot digital with at least two megapixels will work. But a couple of features are desirable. The first is that you want a camera with an internally threaded lens housing. The camera manufacturer puts the threads there to accept screw-in accessories, such as macro or telephoto lenses. But for astro-imaging, these threads also accept available screw-in eyepiece adapters that let you attach the camera firmly to the eyepiece. Another desirable feature is that you don’t want the camera’s lens to move in and out of its housing as it zooms. If it does, and you have the camera attached to an eyepiece, then the two could collide, damaging one or the other, or both.
Other features, such as time exposures, self-timer, settable picture compression (i.e., resolution) settings, and others, while common, are nice but not essential.
Fortunately, there is just such a camera available, namely the Nikon Coolpix 800. It is no longer being produced, but they appear regularly in online auctions for under $100.00. It has 2.1 megapixels, 28mm internal threads on the lens housing (and there are commercial eyepiece adapters available with 28mm threads), and a non-moving 2x optical zoom lens. Also, being a Nikon, it has a lot of features and takes very sharp pictures, considering that most of today’s cameras are 3 megapixels and up. I got mine, a Nikon factory reconditioned unit, on eBay for under $90.00, including shipping. The amazing thing is that this camera sold new two or three years ago for around $300.00 or more! I also purchased a 128 megabyte memory card for it, to be able to store more images, since the camera came with only a 16 MB card.
Virtually any telescope will do. All I’ve used so far is my 8-inch f/8 “Mars Scope,” but others would be just as good. You simply put an eyepiece in the telescope, focus it by eye, and then position the camera’s lens up to the eyepiece in place of the eye. This is referred to as afocal photography, because the light coming out of the telescope is in effect parallel light rays you need your eye, or in this case the camera, to create an image.
Here you have to be a little more selective. Eyepieces with a long eye relief (the distance between the eyepiece’s eye lens and your eye to be able to see the entire field of view) work best. If the eye relief is too short, then you’ll have a hard time getting the full field of view into the camera lens, an effect called vignetting.
You also should start with medium to low-power eyepieces. If you use too much magnification, then the image brightness will go down to the point where exposure times get too long. Start out with a low power eyepiece, which will also likely have a long eye relief. You may have to experiment with your eyepiece arsenal to see which ones work best.
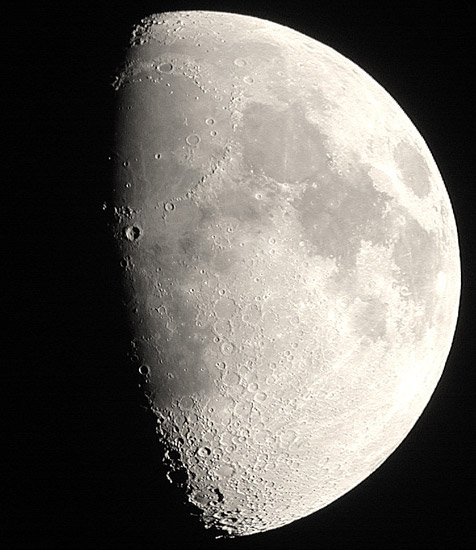
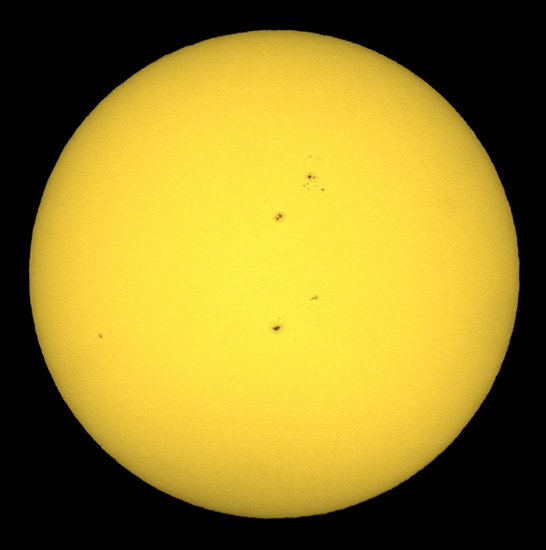
Now if you want to take long time exposures of faint deep sky objects, then this kind of setup probably isn’t going to give you good results. But taking decent pictures of the sun (filtered, of course), and the moon is almost as easy as falling off a log. That’s because with those subjects there’s plenty of light available, and exposure times are more than fast enough, in the 1/60 to 1/250 second range. At that speed, holding the camera by hand will still give you a sharp picture much of the time, plus you won’t need a telescope drive. Planets and bright stars will require longer exposure times, and probably some kind of telescope drive to counter the earth’s rotation. Some point-and-shoots will allow exposures up to a few seconds, but not the minutes that would be needed for even fainter objects.
The idea is to get the camera lens up to the eyepiece, where you would normally place your eye during visual observing. The easiest way is to hold the camera by hand. But you have to be careful to hold it parallel to the focal plane, and center it on the telescope’s exit pupil. Most digitals have a viewing screen so that you can see exactly what is going to be recorded. Once you get it so that it looks right, gently press the shutter. Now when hand holding, the slightest motion while the picture is being taken can result in a blurry image, so you’ll want to shoot “early and often.” You’ll probably end up with a bunch of throw-aways, but you should also get some keepers that are good and sharp, and well exposed. The Coolpix 800 has a function where you can hold the shutter button down, and the camera will take a number of images, and automatically select the sharpest one. I haven’t tried this feature yet though.
As I mentioned earlier, you can purchase adapters to attach the camera directly to the eyepiece. Most of them have a threaded ring that screws into the threads in the camera’s lens housing, and clamp onto the eyepiece, in effect making eyepiece and camera a single unit. For eyepieces that have a removable rubber eyecup, the adapter has set screws that clamp into the groove that the eyecup fits into. With others, the adapter simply clamps onto the eyepiece barrel with non-marring set screws. The nice thing about using an adapter is that alignment between eyepiece and camera lens is not an issue - it’s automatic.
There are a number of companies that sell telescope-camera adapters. An outfit named ScopeTronix sells probably the best selection, letting you mate virtually any telescope to any camera. They even sell eyepieces with 28mm threads built in. No adapter is needed; you just screw the eyepiece directly into the camera’s lens housing. TeleVue sells some camera adapters specifically for their eyepieces, for example an adapter designed for Radians. You can also find adapters that simply mount the camera to the telescope, with a couple articulated arms that let you position the camera in any orientation you wish. But with that kind of adapter it’s up to you to get the camera properly aligned with the eyepiece.
Regardless of whether you are using an adapter or holding the camera by hand, there are a few camera settings to which to pay attention. For high contrast objects such as the moon or the sun, there’s enough detail that you should be able leave the camera in auto-focus and auto-exposure modes. If there is a way to turn off the camera’s flash, then turn it off, as it obviously won’t do any good (duh!). Also, set the camera to its finest picture taking mode available, but remember that your camera’s memory card capacity will dictate how many pictures you can take at a given resolution level. Still, it’s best to capture as much detail as you can, because you can’t create it later if it’s not there. Speaking of detail, if you are using an adapter to mount the camera to the eyepiece, then there’s less opportunity for blurring due to camera motion while the shutter is open. But pushing the shutter button could induce some camera shake, so use your camera’s self-timer if it has one. That way your hands can be completely off while the image is being captured. Also, I’ve found that at least with my camera, I get the best results with the lens zoomed either all the way in or all the way out; intermediate positions tend to vignette. You may have to experiment some with zooming as well.
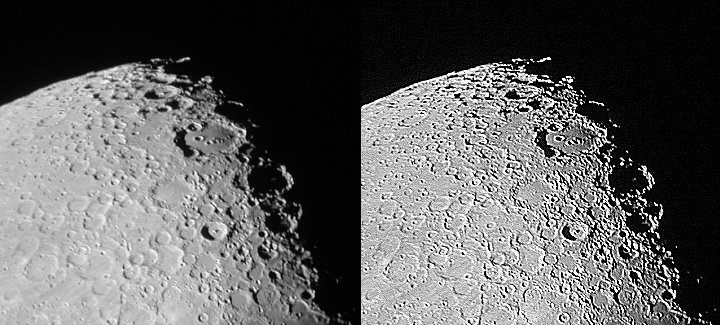
After you take some photos, then you’ll probably want to process them a little before showing them off. There are a number of software packages that let you spruce up your images a little. Nearly all have a way to sharpen them up, and/or adjust the brightness and contrast, and/or adjust the color. Be careful not to overdo the sharpening, though, as it makes the image look worse in many cases. Too much added detail looks artificial, because, well, it is artificial. Add just enough to bring out the detail without making it look fake. The picture below shows a good sharpness level (left), and too much added sharpness (right).
The number of such image processing programs precludes me listing them all here. I use an old shareware version of Paint Shop Pro with good results. Photoshop is another good package, but is a little more pricey.
Here’s what I do with my images. First I remove the red and blue channels, leaving just the green. This removes any red or blue fringes due to any chromatic aberration. Then I convert the green image to grayscale, which will leave it too dark. I then adjust the brightness and contrast to make it look “normal” again, and then add just a little sharpening. With the moon, as a final step I’ll usually add about 10% red and 5% green to make it look a little more natural than just a plain gray. The sun can be left gray, but some folks think it looks better if it’s yellow.
Also, there are inexpensive packages that will let you stack multiple images of the same subject. This method reduces noise and increases the amount of detail in the final image. I’ve not tried stacking yet, but used in conjunction with the multiple image capability of the Coolpix 800 it might provide sharper images. I’ll have to try it sometime.
So give it a try. You’ll be surprised at you easily you can get excellent pictures of the sun and the moon, without costing you an arm and a leg. And isn’t that the Lowbrow way?