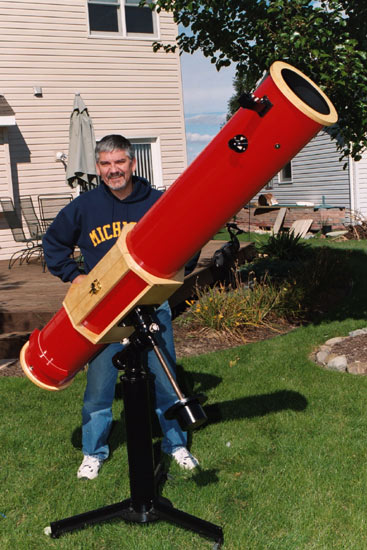

Yes, the Mars scope is done! I had to drag it, kicking and screaming, but yes it is finished. I won’t bore you again with the storied earlier history of this project, but if you wish you can read about it yourself in my article Some People Never Learn, in the February 2003 issue of Reflections. But bringing this project through to fruition, while challenging and frustrating, has also provided some satisfying rewards.
Getting the primary mirror done proved to be more difficult than I envisioned. I scrapped the idea of finishing it spherical and making a flex-cell for it to warp it into a paraboloid. I felt that it would have taken way too long to get a working (emphasis on “working”) version of the cell, plus polish out the mirror to a good sphere. I did not want Mars to come and go again and not have the scope finished in time, so I decided to try to make as good a paraboloid as I could. I started on it late in April (honeydo’s must come first!), expecting it to take no more than a month to figure the already polished out surface. Wrongo! Try twice that long. There was plenty of both trial and error, and many sleepless nights trying to figure out what had gone wrong during the previous evening’s polishing sessions.
I think that now would be an appropriate time to recognize and thank a couple people who were key in completing this project. First, I would like to thank fellow Lowbrow Tom Ryan, without whose expertise and advice I might still be trying to get the figure right. But even more importantly, I must remember to thank Debi, my wife, who exhibited great patience and understanding while I took over her kitchen for a month. Not to mention putting up with my grumpiness when things weren’t going well, which was most of the time! What a gal!
Finally, on June 20, after extensive bench testing and star testing it uncoated in my old optical tube assembly, I deemed the mirror “done.” Perseverance paid off and I managed to get a decent figure on it, about as good as I had hoped when I started. It has a wavefront error of at worst one-tenth wave, and likely better. This was a watershed; prior to this I was hoping that I would complete the project, but now I knew that I would! I carefully packed up the mirror and it’s matching secondary and sent them off to the coating service, namely Spectrum Coatings, Inc., in Florida. With the major hurtle of completing the primary mirror out of the way, it was now time for the “easy” part - the construction of the rest of the scope.
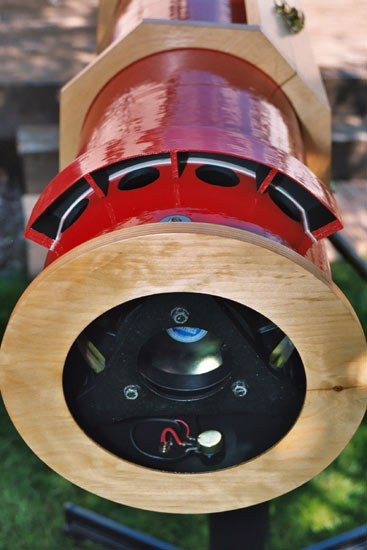
Some of the components I already had on hand from the first incarnation of this scope, including the primary mirror cell (by Novak), the 1.3-inch minor axis diagonal that I “stole” from my 6-inch f/8, and the focuser, a low-profile helical unit made by Lumicon. The rest is new, including a four-vane spider and secondary holder, both also from Novak (can you tell that I like Novak components?), a Rigel Quikfinder 1x reflex sight, a used 3.5-inch computer fan, and a 6-foot long, 10-inch diameter Sonotube in/on which to mount everything. I was originally planning to use a 1-inch minor axis diagonal that I used in the original version of the scope. But after analyzing the optical layout in the program NEWT, it looked like the 1-inch was a little too small, so I opted for the 1.3-inch. It’s still well under 20% of the primary’s diameter, which is generally regarded as the point at which contrast and resolution degradation begins to occur. (NEWT is a freeware program for Windows for laying out Newtonian reflectors. It is readily available on the Internet. Let me know if you are interested and I can direct you to where you can find it.)
I was quoted a 30-day turnaround by the mirror coating service, so I expected that I would have the optical tube assembly done by the time the mirrors arrived, but alas, I did not. While the mirrors arrived right on schedule, almost to the day, I under-estimated how long it would take to construct and finish the tube, fan assembly, and wood parts, and assemble it all. So it was another couple weeks after the mirrors arrived before it was finished.
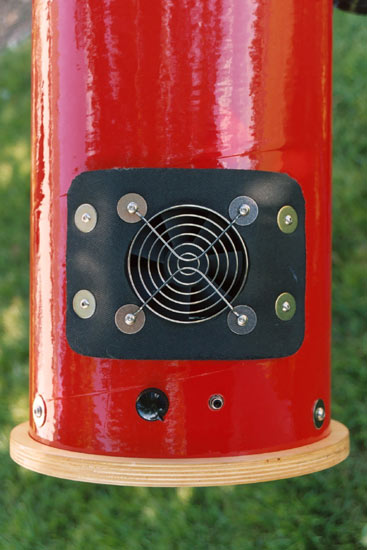
I painted the exterior of the tube with three coats of Krylon polyurethane (brush-on) enamel, which provides a completely waterproof, plastic-like coating. To finish the inside of the tube, I first peeled off the smooth plastic-like lining, leaving a fuzzy, bare cardboard surface. I then sealed it with two coats of shellac, and then blackened it with Krylon ultra flat black spray. The result is a moisture resistant, rough, and very black interior that has very low reflectance even at grazing angles of incidence. The front of the tube extends about 10 inches past the focuser to reduce stray light and to provide some dew resistance for the secondary mirror during those dewy Midwest nights. All mounting hardware throughout is stainless steel, to prevent corrosion from dewy nights as well. I “machined” fore and aft trim/reinforcing rings out of 3/4 inch birch veneer plywood using a router. The rear trim ring has a 7.75-inch aperture that does double duty as an annular baffle to block stray light from the ground sneaking around the primary. Similarly, the front trim ring has a nine inch aperture to provide a little bit of baffling (the tube ID is ten inches). The cooling fan blows across the face of the primary mirror, and out vent holes in the opposite side of the tube. This kind of fan setup is the most effective at breaking up the boundary layer of warmer air in front of the primary, and helps improve the image during cool down. A shield keeps unwanted light, dew, and dirt entering the vent holes and ending up on the mirror. A rheostat lets me control the fan’s speed to “tune out” any unwanted vibration.
The mounting is an old homemade pipe mount that was given to me when I was 14. It has very nicely machined brass sleeve bearings. It is very heavy and solid, even for a heavy and long OTA like this scope. It passes the “standard bonk” test nicely. The only thing it really lacks is a right ascension drive. At 300-400x objects don’t stay in the field of view for very long, and I constantly have to nudge the scope to keep up with the earth’s rotation. Perhaps one of the machinist types in the club could give me a hand at adding an inexpensive drive to it, hint hint!
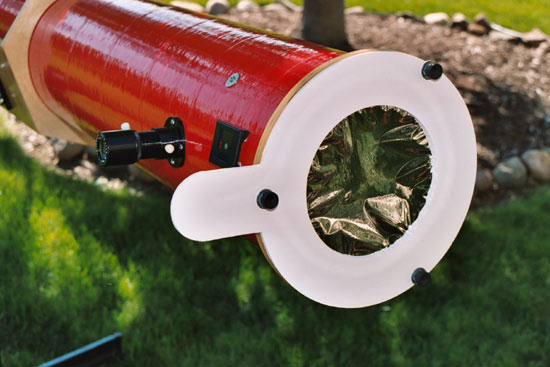
I also made a solar filter for the scope. The filter consists of Baader solar film sandwiched between two layers of 3/16” foamcore board. I put three threaded inserts into the face of the front plywood trim ring so that I could securely attach the filter without any fear of it accidentally coming off while observing the sun (which could have devastating consequences). An “ear” on the filter shades the eyepiece and your eye when the scope is pointed towards the sun.
If “the proof of the pudding is in the eating,” then I must say that the pudding has been very tasty indeed! First light was on the evening/morning of August 6-7, 2003, and I was not disappointed. It was somewhat hazy, but what the sky lacked in transparency it made up for in steadiness. The double double was nearly straight overhead, so I went there first. Wow, it was a really clean split! The air was steady enough that I could “over drive” the scope up to 570x, and the airy disks were perfectly clean, along with their first-order diffraction rings. There was a ton of black, empty space between each pair. I also went over to Zeta Bootis, a close double with components of magnitude 4.5 and 4.6, and a separation of 0.8 arc seconds. It split it, not easily, but split it, even with a little black space in between when the air would settle momentarily.
Later, about three o’clock the following morning, I went on to Mars, which was hovering near the meridian about 30 degrees up. The detail was amazing, at least to me. I had never seen it look so good! My earlier observations were with my 13”, which has an average mirror and is more adversely affected by atmospheric seeing conditions and tube currents. And on previous oppositions with my 6-inch Newtonian, when the Martian disk was much smaller. The south polar cap was brilliant white, with a very sharp edge. The darker markings in the southern part of the Martian globe were also crisply defined, contrasting nicely with the brighter northern hemisphere. I decided to sketch it, which was something of a challenge, because of the amount of detail to record. Throughout the great Mars opposition of 2003, I ended up sketching Mars at least a dozen times, and observed it many more times when conditions didn’t allow for sketching. Yes, my new “Mars Scope” definitely lived up to its expectations!
Most homemade telescopes are never done, and this one is no exception. One of the first things I have planned is to put a really good secondary mirror in it. As I said earlier, the one I’m using now was in my 6-inch, and I don’t remember where I bought it. Knowing that I did not pay a whole lot for it, it is probably just your usual run-of-the-mill diagonal. So, if it’s peak to valley deviation is 1/8 or 1/10 wave (1/4 - 1/5 wave at the wavefront), then it is probably inferior to my primary, and it may be degrading the image. Antares sells 1/20 and 1/30 wave diagonals, so I’ll be ordering one of those some time soon.
Something else I want to experiment with is a curved-vane spider. The diffraction spikes from the straight spider vanes are a little distracting, and a well-designed curved-vane spider (Protostar makes some really nice ones) will eliminate them, while actually decreasing the total amount of diffraction. I think that it’s worth trying.
I’ve already added a magnifying finder, but I also want to add some baffling, and/or black flocking to reduce the amount of stray light bouncing around inside the tube. And add some tube counterweights. And add a drive to the equatorial mount to make visual observations at high power easier. And shorten the pedestal or make a new one to get the eyepiece a little lower when pointing near the zenith. And. well, you get the picture. There are always some improvements that can be made!
In a word, yes! Overall, I’m very happy with the scope. It performs as well as I had hoped when I started it, and I’m sure it will bring me and others a lot of viewing pleasure in the future. It is difficult to describe the feeling of accomplishment one feels when seeing excellent images in an instrument you have built yourself.
Mars may be fading into memory, but that was only a foretaste - Saturn and Jupiter are coming. So bring them on - I’m ready!