
MVS 402
How To Create Team Pages
Where to work on team pages
Make sure you are sitting at one of the NMC classroom Macs to create your team pages. The NMC classroom Macs are setup specifically for this task. If you would like, you may create your team pages on any campus Mac that has Claris HomePage 2.0 or 3.0 on the hard drive. Do not use version 1.0. Access to Claris HomePage may be more difficult if you do not work at the NMC.
Download template
Download the "html_templates" folder to the desktop. Once the "html_templates" folder has downloaded and automatically decompressed, copy it to your ZIP disk.
You should already have a folder for each of your teams on your ZIP disk. If not, create a folder for each of your teams and name it according to their team name. Then put one copy of the "html_templates" folder in each of the team's folders. You can do this by holding down the option key while dragging the "html_templates" folder onto each team's folder, one at a time.
Do not delete these files from your ZIP disk for the rest of the semester. If, for whatever reason, you need a new html_templates folder, download another from this page via the link above. You will use the templates now to create the team pages and later, at the end of the semester, you will distribute the rest of the template files to your teams so they can convert their project reports to html. By learning how to create team pages now, you will be better prepared to help your teams learn how to create their project reports at the end of the semester.
Set Claris HomePage preferences
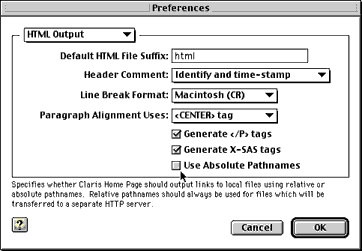
Open Claris HomePage from within the MVS 330 folder on the hard drive of a NMC classroom Mac. With Claris HomePage open, select "Preferences..." from the "Edit" menu. There are two items to set from the pop-up menu in the upper right-hand corner of the preferences dialog box:
1. Select "HTML Output" from the pop-up menu. Then make sure "Use Absolute Pathnames" is unchecked (i.e., NOT checked).
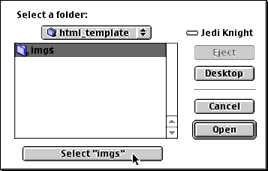
2. Select "Images" from the pop-up menu. Click on the "Set..." button to set the folder in which Claris HomePage will look for or save image files.
In the dialog box that appears, navigate to within the team's html folder that you are going to work with and select the "imgs" folder by clicking on the "Select "imgs"" button.
NOTE: You must reset the images folder within preferences each time you edit a new team's team page. If you do not select the right team folder each time, then your pages wont work properly and will have to be fixed.
Also, each time you open Claris HomePage for a new session, make sure the preferences are set properly as shown above.
Rotate and re-size student pictures
In this section you will learn how to edit the students pictures in Adobe Photoshop that were taken on the first day of lab. This will be good practice because you will have to help your teams use Adobe Photoshop to edit and insert their figure 1 images for assignment P6. You should already have all of the pictures for each of your team's team members on your ZIP disk. They should also be named according to the individuals uniqname.
Open all of your students pictures in Adobe Photoshop. To save time, select all of the picture files at once in the Finder by selecting each file one at a time while holding down the shift key. (Don't double click the files. Single click them while holding down the shift key.) Then you can click and drag all of them at once onto the Adobe Photoshop application icon (make sure the Adobe Photoshop application icon is visible at the same time all of your files are). If all of that didn't make sense, then you could just open them one at a time, as usual.
With all of the pictures open at once, the following steps will take you through rotating, re-sizing, and saving each image, one after the other.
NOTE: As you change the names of the picture files from the individuals uniqname to the new, generic file names specified below, make sure you write down the uniqname and its corresponding file name (e.g., thoogend is member1.jpg in the monkey team or jstreepy is member1.jpg in the bball team). This list will help prevent confusion when you get to the step of entering the name and uniqname of each team member on the team pages corresponding to each picture.
Begin
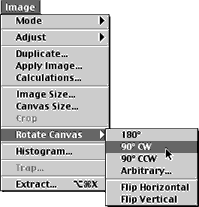
Click on the image to be edited to make sure it is the active window. The image might be turned on its side. If so, then you will to rotate it to the upright position. To rotate the image, select either "90 CW" or "90 CCW" from the "Image>Rotate Canvas" submenu.
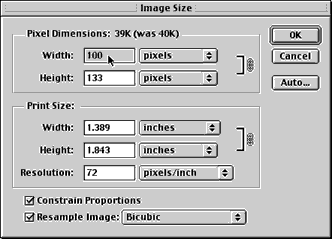
To fit the image in the team page template, you will need to reduce its size significantly. Select "Image Size..." from the "Image" menu. Then set the width to 100 pixels.
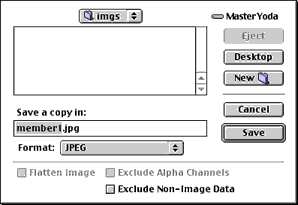
Now the image is ready to be saved for the web. Select "Save a copy..." from the "File" menu. Select "JPEG" from the "Format:" pop-up menu. Name the file "member1.jpg", "member2.jpg", or "member3.jpg". Finally, navigate to the team's html folder that the image belongs to and save the file within the team's "imgs" folder. Click on the "Save" button and the JPEG Options dialog will appear.
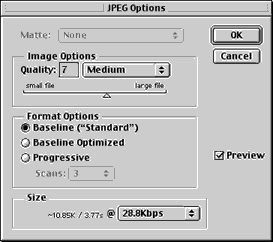
In the JPEG Options dialog box, set the image "Quality:" to 7 under "Image Options" and then make sure "Baseline ("Standard")" is selected in the "Format Options" list. Click the "OK" button to finish saving the image.
Close the image you just saved and move on to the next one. By closing the images once you have edited and saved them, you will know how many are left to edit and will not accidentally edit the same one twice.
Repeat the same steps for each image until you have finished them all.
Open team.html file and set Claris HomePage preferences
With all of the pictures named "member1.jpg," "member2.jpg," and "member3.jpg" and saved in the correct team's "imgs" folder, all of the pictures will automatically show up when you open the team's team page.
Pick a team to start with and open the "team.html" file from that team's team folder. Remember, you renamed the "html_templates" folders for each team according to the team's team name.
Before you get started with editing the "team.html" file, make sure to set the preferences in CLaris HomePage for the team's "imgs" folder you are currently working on. If you don't remember how, review the "Setting Claris HomePage Preferences" instructions above.
Copy and paste team name & project plan
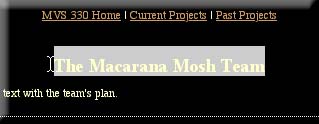
First, select the "The Macarana Mosh Team" title text and paste or type in the team's name as "The (one word team name here) team".
Then repeat the same process for the team's project plan paragraph. Select the "Replace this text with the team's plan" paragraph text and paste in the team's project plan paragraph from their "project plan" document turned in for assignment P1.
Names and Uniqnames
Enter in the name and uniqname of each member under their picture by replacing the "Student Name" text and then the "uniqname@umich.edu" text the same way as above.
Turning in html files for posting
Make sure you finish creating all of your team's team pages before the next weekly facilitator's meeting. Be sure and bring your ZIP disk to the next meeting so you can copy all of your team's html files to the instructor's ZIP disk for uploading.
Think of this web task as a good rehearsal for the end of the semester. Remember, on the last day of lab, the week before project presentations, you will need to help your team's convert their projects to html. That means you need to be an expert on this process. With the team pages behind you, you should be ready for that challenge. Remember what you've learned! And good luck! ; - )

top
The University of Michigan, Division of Kinesiology
Revised 9/99
©1996 Melissa Gross, Ph.D.