Using Your Network
While the first thought when you install a network is typically to share an Internet connection, there are a number of other ways you can use your network. Once you get used to file and printer sharing, you will begin to wonder how you got along without the network. In this chapter, we will cover the more common uses of home networking and some less common uses of home networking:
- Printer Sharing
- File Sharing
- Multi-Player Video Gaming
- Virtual Private Networking (typically used to connect to a company network from home or on the road)
In this chapter, we will focus on networking between Windows operating systems because that is the large percentage of the installed user base. We address some of the issues for non-Windows operating sections in a separate section.
Setting up computers to share printers and files
Before we can share the printers and files, we must make sure to install all of the proper software. While some steps can be eliminated for some of your computers, the simplest approach is to perform the following steps on all of the computers in your network (except perhaps your NAT gateway).
-
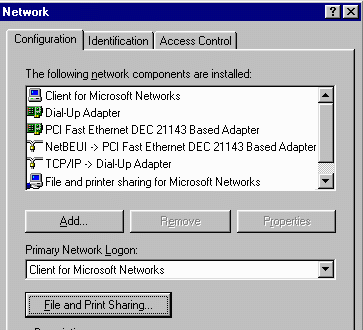 First install the network components NetBEUI, Client for Microsoft Networks and File and printer sharing for Microsoft Networks using the network control panel. If they are not installed, use the Add button and find them under the Microsoft sections for Protocols, Clients, and Services respectively. During the installation, you may be prompted for the operating system disks and have to reboot the computer.
-
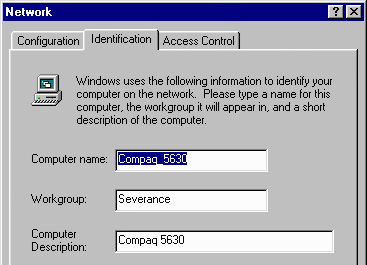
Next set the computer name and the workgroup. The workgroup should be the same for all of the computers in your home. The computer name must be unique for each computer.
-
Under the third tab, set Share Level Control. This means that each resource (printer or files) will be shared based on a unique password for the resource. The other approach, User level access control, requires an NT Domain - which is well beyond the scope of this book. Domain style control of resources is very effective for larger organizations, but is generally too cumbersome for home use.
-
Next, back in the network control panel under File and Print Sharing, check the box to indicate that you wish to share your files and printers. This does not actually share your printers and files, it just makes sure that the necessary software is loaded so that files and printers can be shared.
-
Also in the network control panel, change the setting for
Primary Network Logon change the setting to Client for Microsoft Networks. This will cause a network login screen to come up after Windows is booted at which point you enter an account, leave the password blank, and press OK. If you press Cancel or Escape you will not be logged in and Network Neighborhood may not work.
These steps should make your computer ready to share and use resources across the network. The actual sharing and use of files is relatively simple compared to the preparation steps above.
Just as a short note, the MacOS operating system is automatically pre-configured to "do the right thing" in most cases. There is really no analog for these steps on a MacOS system :).
Sharing a Printer
Once you have installed the proper software and configured your network login, you can share printers or files. First, we will examine the steps necessary to share the printer.
-
First you set the printer up on one computer using a USB or Parallel connection. Install all of the proper device drivers according to the manufacturer's directions. Make sure that the printer works by printing a test page.
-
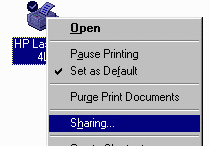 To share the printer, go into Settings | Printers, then right-click on the desired printer and bring up the Sharing dialog. Within the sharing dialog, you give the printer a share name (usually the default is sufficient) and optionally give the printer a password. In a home network situation, it is pretty safe to share printers without using a password.
When the printer has been successfully shared, the printer icon is changed so that a small hand is added to the icon. This way you can tell at a glance which objects are shared and which objects are not shared. Once you have installed the proper software and successfully logged into the network on the client computer, the steps are so simple that they are almost intuitive.
-
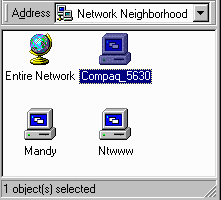 Browse the Network Neighborhood. If you see the name of the server computer, then you are in great shape. Otherwise, take a look at the tips and tricks section for some more sophisticated diagnostics and approaches.
-
 Click on the name of the computer. You should be shown all of the shares - the icon will tell you if the share is a printer or a file system.
-
When you click on the printer icon, you will be asked as to whether or not you want to install the printer. If you say "yes", the printer will be installed. Part of the printer installation installs the necessary printer drivers over the network so you should not have to use the printer driver disk.
Once this is complete, you should be able to print from the client system as if the printer were locally attached.
Sharing Files
In general, unless you have special security concerns, it is a good idea to share all the disk drives on all of the computers. You should assign a password to the disk drive shares. You can use the same password for all of the shares and just make sure that family members all know the password. This way if an intruder is able to gain access to your LAN, then they will not be able to access any data without the password.
There is great convenience to being able to access any file on the home network from any other computer. Especially if you are running around doing "technical support" or helping someone with their homework, needing a file that is two floors away.
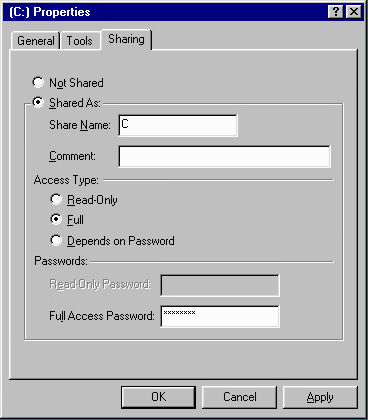 Again, the steps to share and mount a drive are very simple. First we start on the computer which will be sharing out the actual drive or directory. Assuming that you already have the proper file sharing software installed and configured as described above, you simply navigate to the drive that you want to share, right click on the drive or directory and select the Sharing option. Much like the printer, you give the share a name (again the default is usually fine) and a password. With file sharing, you should always use a password. Generally you will want to choose the Full option to allow Read/Write unless you have a specific unique situation. You will be prompted for the password a second time to verify the password.
It is actually not necessary to do anything special on the system which is going to read the data from the share. You simply navigate down through the Network Neighborhood, through the computer and down to the drive. The first time you enter a share you will need to know the password. But from that point forward until you reboot, your computer will remember the password.
You can navigate the network drive just like a normal drive. You can open and save files from the shared drive as if it were local. You may need to develop the skill of jumping to the Network Neighborhood in the Save or Open dialogs, but it does not take long before it is second nature.
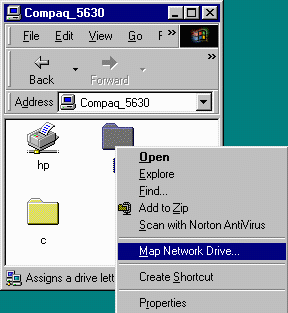 In some situations, you might want to "mount" a network drive and give it a permanent letter. Some software prefers to deal with a drive letter as compared to navigating down through the network neighborhood. This is accomplished by navigating to the drive through network neighborhood to the shared disk. To map the drive, you right-click on the drive and select Map Network Drive. The system brings up a dialog box where you can choose a free drive letter and a check box indicating whether this mapping is just until the system is rebooted or whether you want this drive mapping to happen each time the system comes up.
Typically it is not necessary to map every drive on every computer to a logical drive letter. It is so simple to navigate through the network neighborhood that mapping a drive letter adds little value. Three examples when mapped network drives can be handy are as follows:
-
When you have a place where you store downloaded material that is reusable. For example, you can download one copy of a web browser and install it on several machines. This also can be true for plug-ins such as Adobe Acrobat or RealPlayer.
-
If you have an MP3 collection, instead of putting the media on every computer, simply keep a single copy on the computer with the largest hard disk which stays on all of the time and mount it on the other computers as a pseudo-drive.
-
If you want to schedule a backup to happen late at night you will need to have a mapped disk drive to use for the backup.
After you have your network for a while you will certainly find other more interesting uses for your network drives.
Network Backups
Backing up your computer is one of those things which very few people do well. The hardware is expensive, the tapes are expensive, and it takes a long time to run a backup.
With a network, however you can make very simple and convenient backups from one disk to another. The best approach is to purchase a separate large (can be slow) hard drive and install it in one of your computers and share the drive cross the network. This drive can be used to back up all of the computers in the home network. While it would be a good idea to back that disk drive up to tape from time to time, at least with the disk (for about $100), you have two copies of the data on all of the computers on your network.
Windows-98 has a basic scheduling capability built-into the operating system so the backups can be run late at night in an automated fashion. There are two basic ways to set up an automated backup:
-
Create a batch file which simply does an XCOPY of the important data from the local disk to a subdirectory on the network drive. You create a batch file for each computer and schedule it to run late at night and you have a simple backup solution. This approach has the advantage that the backup data is readily browsable (i.e. you don't have to do a restore), but the disadvantages are that there is no compression and there is no simple way to keep some history over time.
-
You can use the backup program provided by Windows-98 to do a more rigorous backup and enforce a schedule of full dumps and incremental dumps. While this is more complex and the data must be restored, it allows you to have a view of your data over time.
A Network Printer
 Some newer printers can be purchased with a network adapter built into the printer. You can also purchase an external unit which connects a printer to the network. Given the ease of using a computer to connect your printer to the network, using a network attached printer is not commonly done in smaller networks. There are two basic ways to connect a printer directly to the network.
-
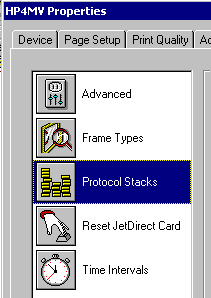
Purchase a printer (typically HP) with an Ethernet connection. The most common product is called JetDirect. You simply connect the printer to the network and install the JetDirect software on each of the client workstations. Then each workstation can print directly to the network printer.
-
Purchase a separate unit which has a network connection and a printer connection. The cost of these units is becoming increasingly affordable. These units appear as servers in Network Neighborhood. Each port on the unit appears as a virtual printer. Clicking on the port installs the printer on the client system.
Having a network printer is very convenient if you do not want to leave a computer on all the time and use several different computers around the house. The key is to weigh the costs of a network attached printer to the benefits that you see.
Sharing Files under NT
If you are installing an NT system, you must make several decisions during installation which cannot be changed without reinstallation. So you should know the ultimate configuration before you install NT. NT Server is designed to operate in very large networks. When you manage a very large network you take a very different view of server configuration. Techniques used for enterprise networks generally are not ideal for small networks.
In the Microsoft vernacular, these two approaches are called Workgroup networking and Domain networking. Domain-style networking is designed for larger networks and centralizes much of the security configuration. Each user has an account on a Primary Domain Controller - passwords and account configuration are all stored on the domain controller computers. Workgroup-style networking allows each workstation to have its own security configuration. In the examples above, we were using workgroup style networking when we add a specific password to each shared drive and printer. If we were using domain style networking, we would have provided a list of users who were permitted to access the resource and the domain controller would have authenticated the users and given access to the resource.
Do use domain-style networking you must have an NT server, so all of the examples in the book are shown for the more typical workgroup-style networking which is typical in Windows non-server environments.
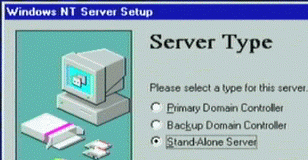 If you install an NT system and want it to interoperate well with your other workgroup systems, you should install it as a Stand-Alone Server instead of a Domain Controller. In the network control panel, you can install the NetBEUI software and configure the system with a workgroup and system name. Then the server can interoperate with the rest of the workgroup-style network clients.
The only other difference in setting up an NT server is how you set up access to the network drives. The simplest approach is to share drives without any passwords - but that gives poor security. A safer approach is to create a user account and password using the NT Server administration tools. Then the drivers and printers can be shared by All Users. This way, any user with a valid account and password can access the drives.
When mounting disks or printers from and NT server on a non-NT system such as Windows-98, the account and password come from two different places. First, the account is what you type into the initial Windows Networking login dialog when the system comes up. When you attempt to access the share over the network, you will be prompted for the password. To keep things simple, typically you would assign the same password to both the NT account and the shared files and printers on your non-NT systems.
In Windows-2000 and beyond, domain-style networking has been improved and extended and is called Windows Directory Services. Like NT domains, Directory Services centralizes much of the security configuration and is somewhat complicated for home use.
Solving File Sharing Problems
One of the most frustrating problems is when you are sure that you have set up network sharing properly but Network Neighborhood seems not to work. This section shows some techniques which you might try to get this to work:
-
Check basic network connectivity. The ping command is an excellent tool if you know the IP addresses of the systems.
-
Make sure that all of the proper software is installed and configured as described above
-
Make sure that you set the identity in the network control panel and set the check boxes that indicate that you want to allow others to access your printers and files. Make sure that your computers have the same workgroup name and have different computer names.
-
Make sure that Primary Network Logon is set to Client for Microsoft Networks on all of the systems and the systems have been rebooted.
-
Make sure that you are actually logging in (no password required) at the Microsoft Networking login screen.
-
Make sure that you actually have something shared. Computers which do not share a drive or printer will not show up in the Network Neighborhood.
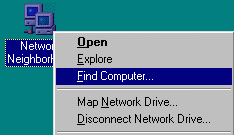 If you follow the steps above and the computer still does not appear in Network Neighborhood, it is possible to access the computer without using Network Neighborhood. Right click on the Network Neighborhood and launch Find Computer. Type in the computer name of the other computer. If the computer is functioning and connected to the network, you will be able to browse the computer. If you can find the computer this way, you know that it is functioning properly. If you can find and browse the computer, but it does not appear in Network Neighborhood, the problem is usually related to the login process.
If the login process seems counterintuitive, it is because Windows is trying to automatically handle the fact that there is a "local login" and a "network login". Windows-98 is trying to automate and coordinate both processes. If you end up with passwords that are causing problems, you can clear out all accounts and password by removing all of the files with the suffix "*.pwl" from the C:\WINDOWS subdirectory and reboot the computers. Make sure to log in with an account name and blank password when prompted for the Microsoft Network login. If during the log-in process, you are prompted for a Windows Login (a smaller window), use the same account name with a blank password.
File and Printer Sharing on Non-Windows Systems
This section provides some pointers as to where to get started and what to expect which trying to do file and printer sharing with other operating systems.
-
Apple computers have had excellent peer-to-peer networking for many years. It is very easy to setup and use. There is software available for MacOS to allow Apple computers to access files and printers on Microsoft Systems, but it typically only supports PostScript printers.
Windows NT Server has services for Macintosh which allows Macintosh clients to connect to NT files and printers. Macintosh Services for NT works with any Windows compatible printer.
With MacOSX, there is a set of tools UNIX tool called samba which allow some interactions with Windows Operating systems.
-
Unix systems such as FreeBSD and LinUX have a set of tools to provide file space and shared printer space for both Apple and Windows client computers. Because UNIX is a server operating system, its support for accessing shared drives and printers on Windows is typically somewhat limited.
If you have set up your own LinUX system then you are probably sophisticated enough to turn on file sharing without much more help.
Multi-Player Gaming
While video game consoles are still very popular with younger children, increasingly adult game players are using personal computers for their gaming. Personal computer performance can be upgraded much more readily than a dedicated game console. PC games are faster, more graphically intensive, and can operate trivially in a multi-player mode.
Games can be played across a local area network or across the Internet or a combination of both. It turns out that multiplayer games actually use a very small amount of network bandwidth so computers can quickly and easily exchange the information even over relatively slow networks.
Depending on the age of the computer game, it may use one of two network protocols to comunicate:
-
Older games will tend to use the Novell IPX protocol.
-
Newer games and games which run over the Internet will use the TCP/IP protocol.
For games which use the TCP/IP protocol, there should be no additional setup once the computers are set up to surf the web and use the Internet for other applications. When using TCP/IP between the computers, you will typically have to enter the domain name (gaming.msn.com) or IP address (192.168.1.10) of the master game server.
If you are playing on your LAN, you have a good reason to use fixed IP addresses rather than dynamically assigned IP addresses distributed via DHCP.
Generally, one system must act as a "master" system and the other systems will connect to that system. Unless you using a server across the Internet, you bring up one copy of the game as a master and then put the IP address of the master system into each of the client systems which are running the game.
 IPX is not an Internet protocol so it only runs over the local area network but it has two advantages that led early multi-player games to choose IPX.
-
IPX ran well in a DOS (not Windows) environment. On early computers, it took every bit of performance to run the game so many games ran only under DOS.
-
IPX did not take a great deal of memory or CPU resources
-
IPX has a way to "discover" network resource (just like Network Neighborhood). So you don't have to assign or know the network configuration numbers to establish a connection between the master game and the client games.
Some games support both protocols so you can use each for its best use.
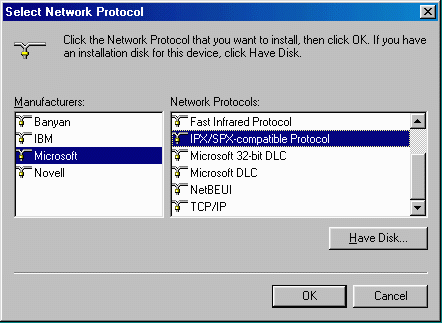
When you are running games which use IPX in a Windows environment, you must install the IPX protocol under Settings | Control Panel | Network Settings . You can find the protocol under the Microsoft protocols. Once installed, IPX needs no additional configuration.
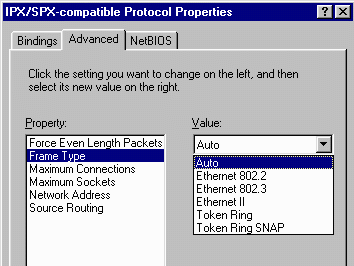 You may encounter a strange situation when mixing different versions of IPX across different operating systems. It turns out that because the basic Ethernet protocol evolved over time, there are several "variants" of the protocol. Most mainstream protocols such as TCP/IP or NetBEUI choose the standard Ethernet protocol format. Novell actually supports more than one variant of the underlying Ethernet protocol. Example variants of the Ethernet protocol are: Ethernet II, 802.2, and 802.3. We won't delve into the (very insteresting) history of how these variants occured. All you need to know is that all of your IXP/Novell configurations must use the same underlying format. So if you are mixing DOS and Windows, or mixing different versions of the protocol, and you are having problems making connections, check the underlying Ethernet format for each of the systems.
Virtual Private Networks
Virtual Private Networks (VPNs) are a way to decribe the act of creating a "new" network using the underlying capabilities of an existing network. One major application of VPN technology is to produce a corporate Intranet using a number of connections to the public Internet rather than direct connections using leased lines. There are obvious security concerns wihch must be solved to keep folks on the Internet from having access to corporate servers or data as it crosses the Internet. But two short high speed connections to the Internet can cost far less than one long connection between two corporate routers.
There are three basic concepts which allow a VPN to use the public Internet to implement a VPN:
-
Encapsulation
-
Tunneling
-
Encryption
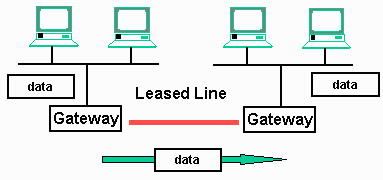 In a traditional Intranet, locations are connected by a long-distance leased line connected to routers at each location. When data needs to be transmitted from one location to another, the data is simply copied from one local area network, sent across the leased line, and then copied onto the local area network at the destination. Because the leased line is dedicated, typically no encryption is necessary.
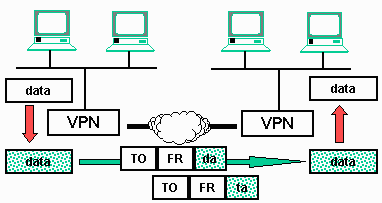 In a VPN environment the process to move data from one location to another is quite different. The routers are replaced by VPN-capable routers. When a packet needs to be moved to the remote location, it is copied off the local area network and encrypted. Then the data is placed in TCP/IP packets (encapsulation) and sent across the Internet to the destination VPN router. At the destination, the data is reassembled as necessary, then decrypted and copied onto the local area network at the destination. This concept of encapsulating data in another protocol and sending it across the net is called tunneling. In a way the data is sent from the source to the destination through a "tunnel".
The net result is the same whether a VPN or Leased line is used to move the data. There may be cost and performance differences between the two approaches. Usually the VPN is less expensive, but sometimes, VPN gives better performance than a leased line solution.
Using a VPN From A Single Computer
While this technology allows two geogprahically distributed local area networks to appear to be connected, the more common scenario that you will use in daily life as a business traveller or as a telecommuter is connecting a single computer to the VPN so that you can access your corporate network in a secure and convienent manner. This is usually done by running VPN software in your computer. While there are a number of different technologies used to implement VPN's, Microsoft included a basic VPN client in all of its operating systems since Windows-95. Many VPN routers will support the Microsoft variant of VPN because client software is readily available under Windows operating systems.
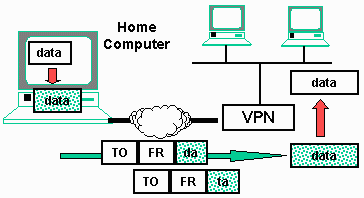 Once the VPN adapter is installed on your computer, al of the VPN processing is done in software on your computer. The data is encrypted, encapsulated, and broken into packets in software in your computer. Then the packets are sent to the corporate VPN system across the Internet where they are decrypted and reassembled, and copied onto the local area network on the destination LAN. This allows you to operate as if you were directly connected to the corporate LAN, reading E-Mail, acessing files, and other operations.
Security is paramount to all VPN operation. There is the obvious password and account which gives you access to the VPN. Many companies add some type of external randomly generated security keys from a vendor such as SecureID (www.securid.com). These external security keys generate continuously changing random numbers. Each user has their own SecureID which is generating the same number sequence as the SecurID system is generating on the corporate LAN. You will only be granted access if you can enter the number displayed on your SecurID and it matches the number generated at the corporate LAN.
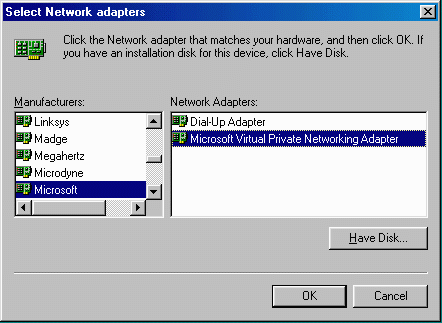 You can make use of your VPN, you must install and condifure the PN software for your computer. If you are using the Microsoft VPN adapter, it is available as an adapter in the network control panel. It makes sense that the VPN software appears to be a "virtual" network card. The VPN adapter is acting as a network card, accepting data packets and sending them to the VPN gateway.
In addition to installing the software, you will also have to configurae a few options for your particular VPN. Because VPN technology is evolving rapidly and there are many different protocols, software suites, and configuration options for each VPN, the best bet is to get help (or at least detailed instructions) from your corporate IT department.
Once configured properly, VPN is very easy to use, securre, and cost effective. While it is out of the scope of this book, you can set up your own VPN using a combination of the VPN software in Windows-98 and the VPN server software included in NT 4.0 and NT 2000. Building the remote end of a VPN using Windows 2000 is actually quite straightforward.
Conclusion
In addition to Internet connection sharing, printer sharing and file sharing are an important benefit of a home network. Using workgroup style networking under Microsoft windows operating systems is realatively easy to configure and very convenient to use.