MVS 330
How To Compress Movies
MVS 330 Home | Course Syllabus | Class Schedule | Lab Schedule
Find Media Cleaner Pro v3.1
- Media Cleaner Pro v3.1 can be found at the Instructional Technology Lab (ITL) in the Chemistry building. The ITL has walk-in hours M-F from 1-5pm. If you would like to contact the ITL staff with questions or to set up an appointment, then use the following e-mail address: itl-staff@umich.edu
Before launching Media Cleaner Pro v3.1 ...
You will need to download the"MVS 330" settings file which contains the specific settings required for the MVS 330 project movies. Locate the "Media Cleaner Settings" folder within the Media Cleaner Pro folder. Download the "MVS 330" settings file now and place it in the "Media Cleaner Settings" folder. Now you are ready to launch Media Cleaner Pro v3.1 and begin compressing movies.
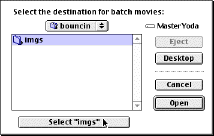
Organizing movie files
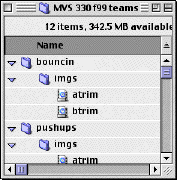
You should organize each team's "atrim" and "btrim" movies into an "imgs" folder within the team folder named according to each team's name. For example, for the "MVS 330 f99 teams," the file structure would look similar to the screen shot below. The teams pictured include "bouncin" and "pushups."
- At the end of the Digital Video lab (P3), create this file structure on a ZIP disk (you will need an empty ZIP disk). At the end of lab, after the facilitators have copied their team's "media files," folder, copy only the respective "atrim" and "btrim" files into the "imgs" folder of each teams folder from the facilitator's ZIP disks.
-
*Not all teams will finish their videos in lab. Invariably, one or two teams have to refilm or have some other problem which doesn't allow them to finish in lab. Since the majority do finish in lab, it's best to get the movie compression out of the way this week so you can start fresh next week. Otherwise the tasks tend to pile up.
-
-
Compressing movie files
- If you haven't already, launch Media Cleaner Pro v3.1. If you are given the choice, then select advanced settings. Otherwise, advanced setttings will be selected automatically and you should see the following window after Media Cleaner Pro has launched.
-
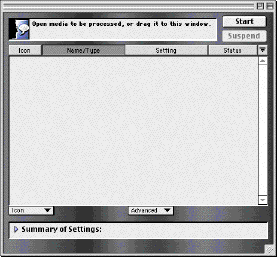
- This window represents the bin that will hold the movies to be compressed after you have dragged-and-dropped them in from the finder. Make sure you copy the file structure on the ZIP disk to the desktop (hold down the option key while dragging) before beginning movie compression. (Compression is much, much faster when working from the hard drive.)
- Because all the movies have the same file name, and it would require a lot of time to rename them all, it is best to compress each team's atrim and btrim movies separately.
- The following steps should be repeated for each team's set of movies:
-
- Step 1. Drag-and-drop the atrim and btrim movie icons from the finder into the Media Cleaner Pro bin window.
- In Movie Cleaner Pro, select both movies in the bin window by choosing "Select All" from the "Edit" menu.
- Step 2. Select "Specify Settings..." from the "Process" menu and choose "MVS 330" from the list of choices on the left. If "MVS 330" doesn't show up in the list make sure you have downloaded and decompressed the "MVS 330" settings file and placed it in the "Media Cleaner Settings" folder as described above.
-